Configuration
Meat and potatoes time. Most of the following dialogs are simple and quick, but a couple of them you have to make sure you get just right. Lilo comes to mind . . . not that it is dificult, but it is easy to skip a step or type something wrong. If you choose autoinstall, Lilo is set up automatically.
Once the packages are all installed, the configuration section of the install begins.
First there's the modem thing. A device I have done without for quite some time. If you still have one, good luck to you. I understand that Linux has gotten much better with modems in the last couple years so configuration must not be too tough. I'm obviously no help in this department, however. I've always chosen no modem.

Lilo
Lilo configuration prompts to not appear when in AUTOINSTALL. If you plan to run AUTOINSTALL, skip this section.
This is the important one. If you screw this up your system simply won't boot.
Common knowledge says use the simple option, to help avoid mistakes, but I can't stand it. If you use simple you get the godawfull lilo boot prompt on startup, which you cannot avoid in the simple setup. So we'll do EXPERT.

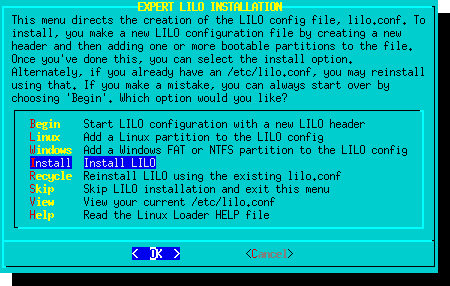
Choose expert
And up comes the Lilo Menu. If we don't make any mistakes, there are three(3) things to do here. DO NOT FORGET one of them!
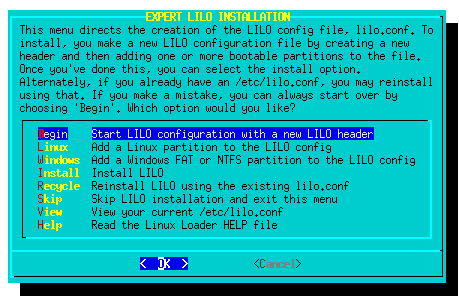
the 3 things to do:
Don't forget any!
Then it asks you about a framebuffer. This can be confusing, although the default works almost all of the time. I have had some problems, but I have found that the 800x600x256 always works. So I choose that.
This is not your screen size when you get into X, this is just the screen size of the text you see when the machine first boots up or you dip into the console (something you likely won't often do . . . )
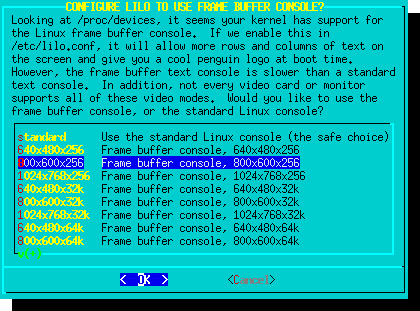
Choose 800x600x256, to be on the safe side
As for passing parameters to the kernel, there is seldom a need. Used to be you had to do so to get CD-burners working, but no more. Best just to leave this blank unless you are really sure of something.
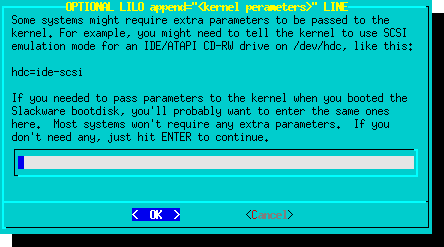
Leave it blank
Then choose where you would like to install Lilo. MBR is good. It can be "unsafe" if your bios doesn't support the capacity of the drive or you have software like "MaxBlast"on it. Chances are you don't. Contrary to some misinformation, you can also still choose to boot to another OS if Lilo is on the MBR. It is the most common and efficient type of install . . .

Install to MBR
Because we choose expert, we get the next 5 screens:
Confirm Location to Install
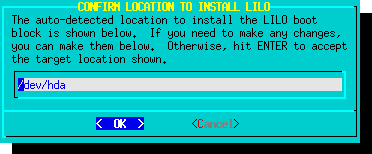
The auto-detected partition is already written in for you, it should be correct.
Timeout
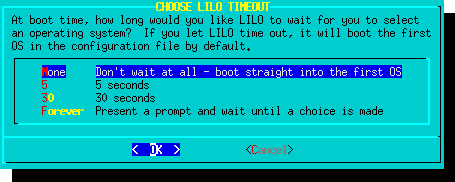
If you are only booting Linux, there is no need to pause at the ugly Lilo boot prompt, so by choosing none, we never have to look at it.
LINUX STAGE
This is part 2 of 3 for the EXPERT install of Lilo. Remember, we have to Begin, then Linux and finally Install.

Choose Linux
Select your Linux Partition
This is not the drive, this is the PARTITION on the drive. The dialog should have guessed it properly and be displaying it for you. You have to type it in. The asterisk under "bootable" is a good indication . . .
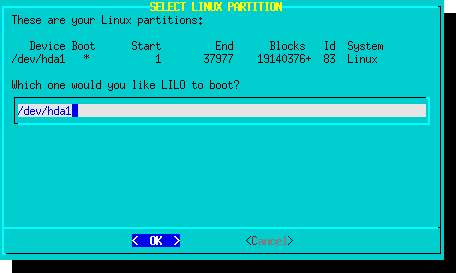
Type it in. Check it twice. This is the most important.
Choose a name for the partition
Pretty arbitrary, whatever you put here. If you have several possible partions you would need it to differentiate them. If you have one partition and will not be dealing with the Lilo boot prompt, you will never see this again. . . . and you don't have to be cryptic for the sake of security.

Whatever you want. Keep it short, we.ve got other things to do : )
FINALLY --
back at the Lilo menu we need to do the last important step: to actually install Lilo onto our drive. If there is no Lilo, the computer will not boot up.
Don't ever,ever forget to install. (And yes, I have : (
Common knowledge says use the simple option, to help avoid mistakes, but I can't stand it. If you use simple you get the godawfull lilo boot prompt on startup, which you cannot avoid in the simple setup. So we'll do EXPERT.
Choose expert
And up comes the Lilo Menu. If we don't make any mistakes, there are three(3) things to do here. DO NOT FORGET one of them!
the 3 things to do:
- Begin
- Linux
- Install
Then it asks you about a framebuffer. This can be confusing, although the default works almost all of the time. I have had some problems, but I have found that the 800x600x256 always works. So I choose that.
This is not your screen size when you get into X, this is just the screen size of the text you see when the machine first boots up or you dip into the console (something you likely won't often do . . . )
Choose 800x600x256, to be on the safe side
As for passing parameters to the kernel, there is seldom a need. Used to be you had to do so to get CD-burners working, but no more. Best just to leave this blank unless you are really sure of something.
Leave it blank
Then choose where you would like to install Lilo. MBR is good. It can be "unsafe" if your bios doesn't support the capacity of the drive or you have software like "MaxBlast"on it. Chances are you don't. Contrary to some misinformation, you can also still choose to boot to another OS if Lilo is on the MBR. It is the most common and efficient type of install . . .
Install to MBR
Because we choose expert, we get the next 5 screens:
Confirm Location to Install
The auto-detected partition is already written in for you, it should be correct.
Timeout
If you are only booting Linux, there is no need to pause at the ugly Lilo boot prompt, so by choosing none, we never have to look at it.
LINUX STAGE
This is part 2 of 3 for the EXPERT install of Lilo. Remember, we have to Begin, then Linux and finally Install.
Choose Linux
Select your Linux Partition
This is not the drive, this is the PARTITION on the drive. The dialog should have guessed it properly and be displaying it for you. You have to type it in. The asterisk under "bootable" is a good indication . . .
Type it in. Check it twice. This is the most important.
Choose a name for the partition
Pretty arbitrary, whatever you put here. If you have several possible partions you would need it to differentiate them. If you have one partition and will not be dealing with the Lilo boot prompt, you will never see this again. . . . and you don't have to be cryptic for the sake of security.
Whatever you want. Keep it short, we.ve got other things to do : )
FINALLY --
back at the Lilo menu we need to do the last important step: to actually install Lilo onto our drive. If there is no Lilo, the computer will not boot up.
Don't ever,ever forget to install. (And yes, I have : (
[end Lilo section]
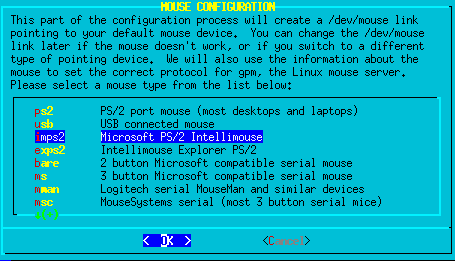
With Lilo safely behind us it's time for the stretch run. The mouse I leave at imps2. Switch to usb if that's what youve got... but after you install and reboot the xorg configuration gets run, (automated) and it seems to take care of the mouse very well. So if you hit the wrong thing here, no sweat.
I always hit OK and never have a problem.
If you NEVER plan on using a terminal window (xterm is the one used by Absolute) I supose you could say no to this -- but I can't see a valid reason not to run gpm. It uses next to no resources and is extremely handy in the cli (command-line interface). It allows you to highlight text in an xterm (ususlly the results of a command) -- then paste it into another window or editor by using the middle-button (or scrollwheel, or both buttons at the same time, depending upon your mouse.) Has saved me many tedious hours.

Configure Network
Network configuration, by default, has been taken over by NetworkManager. So the default choice is NOT to configure the network manually... but if you have a slow machine and do not want the networkmanager to run in the background, keep reading this section, otherwise you should choose No and skip down to the Startup Services section.
For a wired connection on an older computer, run the setup, but also make sure to disable the network manager in the RUN SERVICES MENU, you will find it on the system menu under:
SYSTEM TOOLS > CONFIGURATION > RUN SERVICES MENU
The first step in network config is the hostname. Don't be fooled, this is the name of the machine you are installing, not your internet host or network server. If you are on an intranet (internal network) and it had network shares set up, Samba running and all the rest, you'll probably have to check with the admin about the name to use and later the static IP, etc -- but for the sake of this How-To we will assume you are NOT on an intranet and that you hook up through cable. Since we're going with that, the hostname does not really matter.
The geek-squad likes to use "foo" for anything unknown or unimportant, so you can use that if you have the inclination. Or your first name, the pet dog . . . whatever.
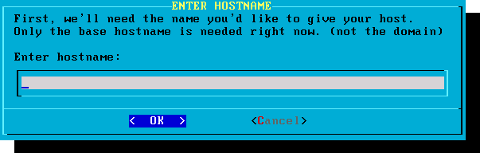
Use your imagination.
If you WERE behind a machine that sets the names and IPs of machines on your network - a nameserver, you'd set the fully-qualified domain name - ie. yourdomain.org. But since we are assuming NOT, this entry is also unimportant.
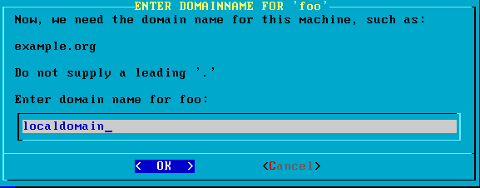
Whatever . . .
Then there is the ipconfig type. Static, DHCP or loopback. Conecting through an internet service provider, like a cable modem company, you would be setting this to DHCP (except in the case of some business accounts, which are given static IPs.)
If you are on a local network, being served the internet through a network host, then it would be static. Your machine might have a specific IP address assigned to it or, more frequently, would get an IP address from a range of addresses allowed by the server.
Loopback is the right option to use if you have a modem, and will be connecting via dialout and PPP. You'll select loopback now, and then set up your phone connection later using pppsetup.
Continuing our assumption that you are connecting to a broadband service, you would choose DHCP, as shown below.
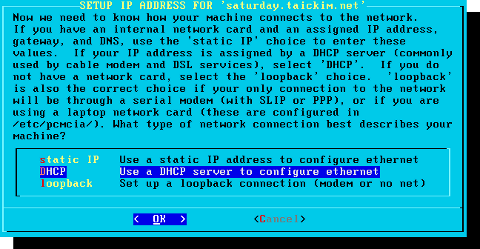
Choose DHCP.
This section will show up ONLY if you have chosen DHCP as the type of network connection.
The DHCP hostname is usually left blank, but some providers will give you a DHCP hostname (Cox is one that does) that you'll also need to enter in order to identify yourself to the network. If you were given a hostname, enter it now. Otherwise leave this blank.

Usually left blank
End of DHCP-only section.
End of Networking section.
When you are done with the networking section you will get a confirmation dialog. Check that you set things correctly and then move on to the last few items --
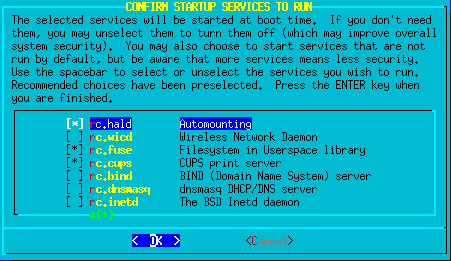
The startup services are next. CUPS is on by default for printing support, you can turn that off if you do not have a printer. The others that are active by default should really be left alone for the system to run properly. Activate anythng else you feel you might need, for example WICD if you intend to use a WIRELESS internet connection.
Hardware clock set to UTC -- I always say no. The default is no. I think everybody says no.
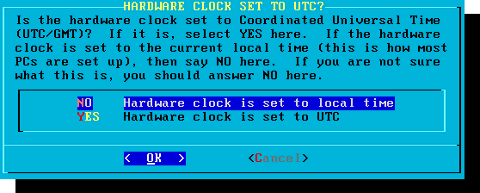
Say No
Set your time zone:

I can't tell you which one this is : )
Oooh, now we're really close. The install routine will now prompt you for a password.

You will have to type it twice. 3 times if it is a "weak" password.
After that you finally get the "Setup Complete" message:
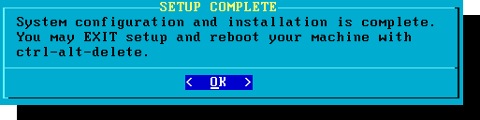
And the Setup menu returns and, as I promised, you select Exit, you fall back into a text screen, and you give the machine the three-fingered salute.

After choosing exit and clicking [ enter ] for OK, salute with [ctrl] [alt] [Del]
The computer will reboot.
Then it's time to do the real work : )